HALF LIFE - STRIDER


Given the tricky nature of Strider I may have somewhat underestimated certain things from an engineering perspective, after all - making a 19 inch tall figure on really thin legs stand on its own with no outside armature support was always going to be tricky.

Nonetheless.. this is what I did.. Including what I think I should have done differently - so if any body sees this and thinks 'hmm I might try that' there are a couple of things I did that you should... maybe not do?.

It begin-th


To start I gathered bit of reference and again managed to stumble upon a 3d file which I could open and view in Photoshop!


From this I was able to scale it up to the size I wanted and print out some plans to build the armature against.

These flat plans were printed onto paper and the armature was build on top of it to get the sizes just right


not a 'thingy'
There are many different techniques to get skin textures into a piece - and I'm still learning my way around that - for this piece a sewing needle is scratched into the surface using various amounts of pressure through a sheet of cling film - the cling film softens the marks you make rather than scratching directly onto the surface.


For the gun pieces that stick out of the figure I used bits of a ball point pen cut to size.


I painted the figure in Vallejo acrylics, followed with washes of acrylic in various shades of brown and then lightly dry brushed to bring out some of the texture to the skin and sealed with Plastikote satin sealer.


A master of the legs was sculpted from Super Sculpey and moulded in a condensation cure silicone. 


These were then cast in this resin from DWR plastics - there are a few variations - but this one is the not so smelly version. It cures a little on the brittle side, so when I came to casting my strider legs I did so with a steel rod embedded into the resin to make them a little less flippy flop.


The top and bottom parts of the legs were joined together with another rod and Milliput - but I straight up did this wrong!


These should really have been one continuous piece - they'd have been much stronger than what I ended up with - this thing is 19 inches tall and I go and design a weak point into the legs - I should have woken up and smelled what I was shovelling.

They aren't total weak sauce - but they could have been much stronger.


ANYWAY


The legs had their little stripy stripe painted on (Vallejo orange rust) and again sealed in satin clear coat. They were attached to the body using a square rod (K+S brass tubing). A square rod would stop them waving about too much.


The tippy top cover of the strider was finished up with a gloss coat. (I used Citadel Ardcoat).

And this was the first time it stood up on its own.


With the strider sorted it was time to start work on the dioramamama.

The Diorama

For the diorama, I wanted the strider to look like he'd stepping in something - something like this...


Interesting? This car was going to be painted as if it had been abandoned for some time and had become a bit busted - rust effects coming right up!


I wanted something with a quicker working time than Milliput - so to fill seam lines and small holes I used this stuff - it can be cleaned up with water and is good for small gaps or cracks and things like that. I give it 7 thumbs up (Simpsons joke.)


One of the strider's legs was going to have gone right through the roof. For this I carved out an opening and applied some scraps styrene to give that bend in and pierced metal look. I also cut open the door with a scalpel and snipped the roof to bend it in a little. The gaps were then filled in with milliput. 


I also bashed a dremel around the surface to roughen it up a bit.


Bullet holes were added by drilling holes in two stages - a first hole going all the way through and a second slightly larger hole just a bit of the way to taper the edges.


Before

After!
The rust effects were done using hairspray - something I learnt from a model maker chap. I sprayed the entire car in the rust colours I wanted, then applied a couple of coats of hairspray which will act as a barrier to whatever you paint on top. I applied my top coat colour and waited for that to dry and then applied a wet brush to the areas I wanted to rust - the top coat just comes right off.


Some spatters of paint are also interesting if you spray your paint through a mesh or sponge.

before

after


The glass part was sanded with various grades of wet and dry sandpaper until it was smooth but foggy looking - I then carved out sections of it to look like a young scallywag had hurled a rock or two through it at some point.

And when it's was all put together it looked suitably ropey.


The kit itself was a simple one and the whole process with the car was really quite quick. It was pretty cool to do an airfix kit as I don't usually do those... perhaps another project in the future may call for something else... a jet? an old warship? hmm.


The figure was mounted onto the base after much guessing and worrying about it falling over. When it finally stood on its own unsupported it was time for a cup of tea.

the crowd goes wild
The smooth base has bits of car filler lumped onto it places to create a more natural uneven surface.


Decoration was done with that scatter stuff model-people use for their railways and game tables - it's really cool stuff - I'm going to put it on everything now - necessity be damned.

There was a lot to do - so much so I had people round to help.


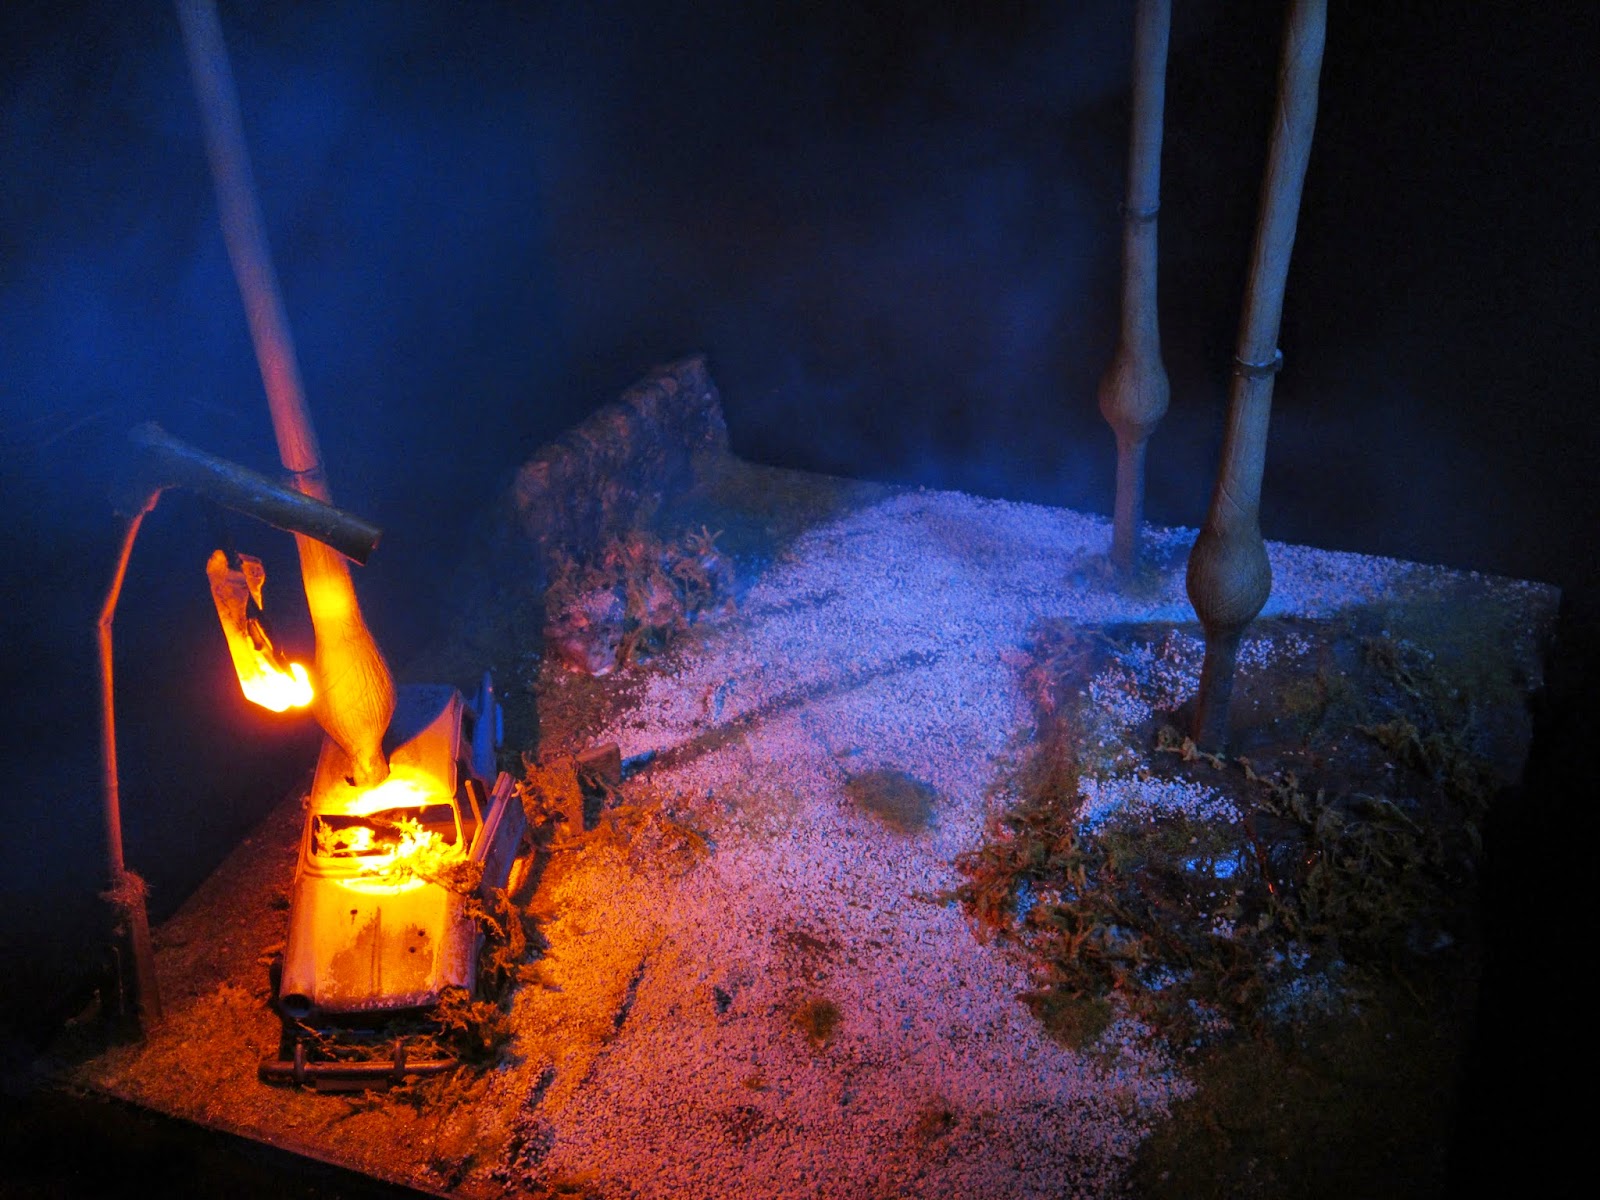
Little details added afterwards such as this rusty lamp-post have a battery powered orange LED dangling out of it. It was made out of bits of a disposable razor and a bit of aluminium wire covered with a drinking straw.


The rockery. Made out of foam. Carved with a dremel tool.


The Finished thang

These shots were taken on a long exposure, painting the parts we wanted out with a blue light. Smoke was occasionally blown in for added atmosphere.


Thanks for looking.

ODDWORLD - GREETER


This was made a long time ago (2013), but it came together really quickly - mostly through luck. I've been mostly reluctant to post this as there is still ONE MORE THING I want to do to it, but I can just update when I get around to it!


THE BODY


All of my figures are scaled from a reference image, but overall size is just me pointing at a spot on a ruler... it's as scientific as that.

I searched around the town for a cylindrical object in the size that I wanted I actually found a waste paper bin in EXACTLY the size I wanted. It needed to be wider at the stop than the bottom by just the right amount... and it was - behold the bin of plenty...


The bin itself was 20mm too short though, but this was solved with an additional strip of styrene glued along the bottom.


To give that welded beading look, millput was added around the edge with sculpted detail added.


The smile was drawn on in pencil and holes were drilled to mount the lips. The big red lips are made from a length of red vacuum hose. It is secured on with threaded rod and a nut which pulls the hose towards the body.

a bit extreme?

The whole thing was then painted in some brown textured paint from Rustoleum. It's great stuff, has a good sandy texture to it and is really durable!


Gouges were added with a dremel tool into the surface. This combined with the textured paint created the good old water tank look that I needed!

THE LID


For the top of the greeter (which again was a lucky find) I used a saucepan lid which fit perfectly onto the top of my waste paper bin.


The handle was removed and the resulting hole filled. This was also painted with textured paint. To get those little raised elements you see there I beaded some super glue over the surface and let it dry. The lid was made of glass, so there was no way I was going to be carving into that with a dremel!


(Super secret radish fact - the handle from this lid later became the rear of the jet engine used in my Earthworm Jim build - check it out here!)

THE BOTTOM BIT


The bottom section of the greeter has 8 lights in it. This section was made with styrene wrapped around a plastic lid from something. Brass pieces (I forget what they are) where used to make sure the holes were circular.


Red LED's were mounted and soldered together, powered by a single 9V battery hidden inside the vast cavern that is the body. To stop the light shining through where I didn't want it to a ring of black styrene was added to the inside.


THE BACK


The pipework on the back was made from copper pipe. This was also given a light dash of textured paint.

THE WHEEL


The wheel is a plastic lawnmower wheel. Its design kind of matched the reference. The bits that hold it together were made from various pieces. The large curved section was made from styrene and filled with Milliput.


The wheel was then painted, with just a smattering of the textured paint. The whole thing is held together through a central threaded rod which everything screws onto. Washers and nuts hold the pieces in place.


THE SMILE

Cheeky...


I used this  reference material by AVEcotone to photoshop a smile which I could wrap around the body. The scale was worked out by laying paper over the body and tracing the shape I needed on to it. I then scanned the resulting shape and used it as a template to fit the smile in to.

Initially I had planned to apply this as a water-slide decal - but its size made it far too weak to position correctly or stay in place without bubbling or ripping. In the end I used a sheet of card stock which I coated in gloss sealer.


FINISHED!

Greeter is 20 inches tall, and around 9 inches at his widest point. He always has something to smile about.


Thanks for reading.